Angular & NgRx Data
Ngrx/data
Ngrx data es una extensión de ngrx que nos permite minimizar la cantidad de información o complejidad de nuestro modelo de datos, podemos llamarlo una automatización de todo nuestro flujo de trabajo en nrgx, https://ngrx.io/guide/data.
El flujo normal se ve de esta manera
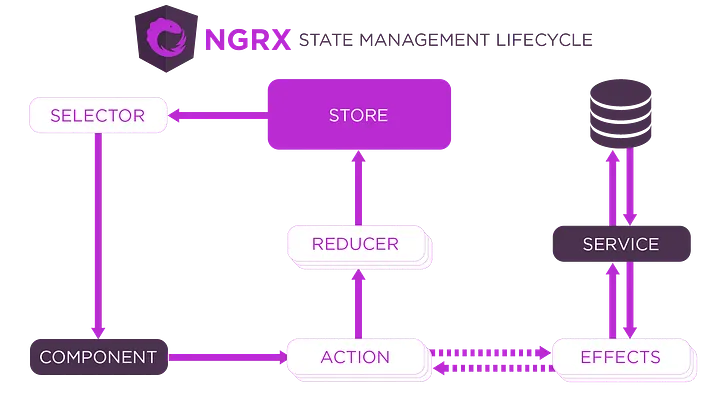
Nosotros vamos agregando capas a medida que necesitemos, tenemos control sobre todo el proceso lo cual puede resultar extenso y más complejo.
En ngrx data tendríamos un flujo parecido, pero sería una caja negra para nosotros, todo ese flujo lo gestionaría directamente ngrx data
https://slides.com/jiali/deck-5
Nuestros componentes interactuarían de forma directa solo con el entityCollectionService, dándonos acceso a las operaciones crud de nuestras entidades y por debajo este desencadenaría todo lo necesario para seguir con su flujo.
Cabe mencionar que en el diagrama vemos la capa de DataService, está una de las curiosidades debido a que el mismo ngrx tiene la capacidad de hacer las llamadas a nuestro backend de forma automática, no necesitaríamos programar estos servicios de conexión a la api, en caso de ser necesario también podemos crear dataService personalizados para gestionar el acceso a la data, imaginemos que es en memoria, podríamos crear un dataService que en vez de ir a un backend devuelva la data en memoria para el flujo de ngrx.
Manos a la obra
No podemos desligar ngrx de angular, por lo que el primero paso es crear el proyecto con https://cli.angular.io/
Creamos el proyecto
ng new ngrx-data
cd ngrx-data
con el proyecto en angular listo procedemos a instalar ngrx data, debemos tener en cuenta que para esto debemos instalar la suit completa, debido a que por dentro crea un flujo completo pasando por efectos y entidades.
ng add @ngrx/store@latest
ng add @ngrx/effects@latest
ng add @ngrx/entity@latest
ng add @ngrx/data@latest
ng add @ngrx/store-devtools@latest
Si todo se instala de forma correcta, en nuestro app.module.ts debemos tener algo parecido excluyendo HttpClientModule, deben importarlo debido a ngrx data se encarga de hacer llamadas a la api y dará error si no encuentra el módulo.
import { NgModule } from '@angular/core';
import { BrowserModule } from '@angular/platform-browser';
import { AppRoutingModule } from './app-routing.module';
import { AppComponent } from './app.component';
import { EntityDataModule } from '@ngrx/data';
import { entityConfig } from './entity-metadata';
import { EffectsModule } from '@ngrx/effects';
import { StoreModule } from '@ngrx/store';
import { HttpClientModule } from '@angular/common/http';
import { StoreDevtoolsModule } from '@ngrx/store-devtools';
import { environment } from '../environments/environment';

@NgModule({
  declarations: [AppComponent],
  imports: [
    BrowserModule,
    AppRoutingModule,
    StoreModule.forRoot({}),
    EffectsModule.forRoot([]),
    EntityDataModule.forRoot(entityConfig),
    StoreDevtoolsModule.instrument({
      maxAge: 25,
      logOnly: environment.production,
    }),
    HttpClientModule,
  ],
  providers: [],
  bootstrap: [AppComponent],
})
export class AppModule {}
Vamos a crear una pequeña libreta de contacto, lo primero es definir nuestra entidad, es la base de todo.
/entities/contact.ts
export interface Contact {
  readonly id: number;
  readonly name: string;
  readonly number: number;
}
Con nuestra entidad definida, debemos registrarla en nuestro entity-metadata que después se encargara de hacer el match entre nuestro entityCollectionService y la entidad correspondiente
/entity-metadata.ts
import { EntityMetadataMap, EntityDataModuleConfig } from '@ngrx/data';

const entityMetadata: EntityMetadataMap = {
  Contact: {},
};

const pluralNames = {
  Contact: 'Contacts',
};

export const entityConfig: EntityDataModuleConfig = {
  entityMetadata,
  pluralNames,
};
Con esto ya estamos listo para ir a nuestro componente, en este caso voy a realizar toda la lógica en el app.component.ts, el primero paso es obtener un entityCollectionService, esto realmente se puede hacer de dos maneras, utilizando un factory directamente en el componente o creando una clase aparte y extendiéndola de EntityCollectionServiceBase
Vamos poco a poco, creamos una variable, contactCollectionService, implementamos un constructor de nuestro app.component.ts e inyectamos el entityCollectionServiceFactory para crear nuestro entityCollectionService.
import { Component, OnInit } from '@angular/core';
import { EntityCollectionServiceFactory } from '@ngrx/data';
import { Contact } from './entities/contact';

@Component({
  selector: 'app-root',
  templateUrl: './app.component.html',
  styleUrls: ['./app.component.scss'],
})
export class AppComponent {
  title = 'ngrx-data';
  contactCollectionService;

  constructor(private entityCollectionServiceFactory: EntityCollectionServiceFactory) {
    this.contactCollectionService = this.entityCollectionServiceFactory.create<Contact>('Contact');
  }
}
Listo, tenemos nuestra colección de contactos, vamos a implementar unos cuantos métodos para obtener los contactos y créalos.
Aquí podemos observar todos los métodos que nos brinda el entityCollectionService https://ngrx.io/api/data/EntityCollectionService
Intentemos obtener los contactos, vamos a implementar el OnInit y una función getAll
import { Component, OnInit } from '@angular/core';
import { EntityCollectionServiceFactory } from '@ngrx/data';
import { Contact } from './entities/contact';

@Component({
  selector: 'app-root',
  templateUrl: './app.component.html',
  styleUrls: ['./app.component.scss'],
})
export class AppComponent implements OnInit {
  title = 'ngrx-data';
  contactCollectionService;

  constructor(private entityCollectionServiceFactory: EntityCollectionServiceFactory) {
    this.contactCollectionService = this.entityCollectionServiceFactory.create<Contact>('Contact');
  }

  ngOnInit(): void {
    this.getAll();
  }

  getAll() {
    this.contactCollectionService.getAll();
  }
}
Si vamos al navegador y vemos la consola podemos observar un error
GET <http://localhost:4200/api/contacts/> 404 (Not Found)Excelente, como lo mencionamos la capa de DataService implementa de forma automática lo necesario para hacer las llamadas correspondientes a la api, como podemos observa el path corresponde a la configuración en plural que definimos en el entity-metadata
Vamos a levantar un pequeño servidor con json-server para hacer las pruebas
npm install json-server --sDCreamos un script en nuestro package.json
"json-server": "json-server --watch db.json"Y creamos un archivo db.json en la raíz del proyecto
{
  "contacts": []
}
Listo, tenemos nuestro servidor corriendo en el puerto 3000, vamos a añadir unos cuantos contactos y validar que funcione
{
  "contacts": [
    {
      "id": 2,
      "name": "contact 1",
      "number": 3333333
    },
    {
      "id": 1,
      "name": "contact 2",
      "number": 222222
    }
  ]
}
Procedemos a cambiar la configuración de la url del collectionService, definimos un defaultDataServiceConfig en el app.module.ts y creamos un provider
//...
const defaultDataServiceConfig: DefaultDataServiceConfig = {
  root: '<http://localhost:3000>',
  timeout: 3000, // request timeout
};

@NgModule({
  //...
  providers: [{ provide: DefaultDataServiceConfig, useValue: defaultDataServiceConfig }],
  //...
})
export class AppModule {}
Vamos de nuevo al navegador y validamos que en el network que tengamos como respuesta lo siguiente
// <http://localhost:3000/contacts/>
[
  {
    "id": 1,
    "name": "contact 1",
    "number": 3333333
  },
  {
    "id": 2,
    "name": "contact 2",
    "number": 222222
  }
]
Ahora vamos a renderizar esto en el html, creamos una variable contacts de tipo observable y en el constructor le establecemos el valor de las entidades de nuestro contactCollectionService
export class AppComponent implements OnInit {
  title = 'ngrx-data';
  contactCollectionService;
  contacts: Observable<Contact[]>;

  constructor(private entityCollectionServiceFactory: EntityCollectionServiceFactory) {
    this.contactCollectionService = this.entityCollectionServiceFactory.create<Contact>('Contact');
    this.contacts = this.contactCollectionService.entities$;
  }

  ngOnInit(): void {
    this.getAll();
  }

  getAll() {
    this.contactCollectionService.getAll();
  }
}
app.component.html
<h2>Contactos</h2>
<ul>
  <li *ngFor="let contact of contacts | async">
    <div>
      <strong>Nombre: </strong>
      {{contact.name}} | <strong>Numero: </strong> {{contact.number}} |
      <button>Eliminar</button>
    </div>
    <br />
  </li>
</ul>
Vamos a eliminar un contacto, para esto debemos agregar una redirección de rutas a nuestro servidor debido a que los patchs son diferentes, creamos el archivo routes.json en la raíz del proyecto
{
  "/contact": "/contacts",
  "/contact/:id": "/contacts/:id"
}
Y modificamos el script de package.json
"json-server": "json-server --routes routes.json --watch db.json"En el app.component.html modificamos el boton eliminar
<h2>Contactos</h2>
<ul>
  <li *ngFor="let contact  of contacts | async">
    <div>
      <strong>Nombre: </strong> {{contact.name}} | <strong>Numero: </strong> {{contact.number}} |
      <button (click)="delete(contact.id)">Eliminar</button>
    </div>
    <br />
  </li>
</ul>
En el app.component.ts agregamos la función eliminar
import { Component, OnInit } from '@angular/core';
import { EntityCollectionServiceFactory } from '@ngrx/data';
import { Observable } from 'rxjs';
import { Contact } from './entities/contact';

@Component({
  selector: 'app-root',
  templateUrl: './app.component.html',
  styleUrls: ['./app.component.scss'],
})
export class AppComponent implements OnInit {
  //...
  delete(id: number) {
    this.contactCollectionService.delete(id);
  }
}
Por último vamos a implementar un formulario para crear un contacto y damos por terminado el código, primero importamos el FormsModule y ReactiveFormsModule en app.module.ts
@NgModule({
  declarations: [AppComponent],
  imports: [
    //...
    FormsModule,
    ReactiveFormsModule,
  ],
  providers: [
    {
      provide: DefaultDataServiceConfig,
      useValue: defaultDataServiceConfig,
    },
  ],
  bootstrap: [AppComponent],
})
export class AppModule {}
Agregamos el formulario al html y un mensaje de loading
<h2>Crear Contacto</h2>
<form [formGroup]="form" (ngSubmit)="create()">
  <input type="text" placeholder="Nombre" formControlName="name" />
  <input type="number" placeholder="Numero" formControlName="number" />
  <button type="submit" [disabled]="form.invalid">Crear</button>
</form>

<h2>Contactos</h2>
<ng-container *ngIf="loading |async; else elseTemplate"> loading ... </ng-container>

<ng-template #elseTemplate>
  <ul>
    <li *ngFor="let contact  of contacts | async">
      <div>
        <strong>Nombre: </strong>
        {{contact.name}} | <strong>Numero: </strong> {{contact.number}} |
        <button (click)="delete(contact.id)">Eliminar</button>
      </div>
      <br />
    </li>
  </ul>
</ng-template>
Creamos el método crear en el app.component.ts
import { Component, OnInit } from '@angular/core';
import { FormBuilder, FormGroup, Validators } from '@angular/forms';
import { EntityCollectionServiceFactory } from '@ngrx/data';
import { Observable } from 'rxjs';
import { Contact } from './entities/contact';

@Component({
  selector: 'app-root',
  templateUrl: './app.component.html',
  styleUrls: ['./app.component.scss'],
})
export class AppComponent implements OnInit {
  title = 'ngrx-data';
  contactCollectionService;
  contacts: Observable<Contact[]>;
  form: FormGroup;
  loading: Observable<Boolean>;

  constructor(
    private entityCollectionServiceFactory: EntityCollectionServiceFactory,
    private fb: FormBuilder,
  ) {
    this.contactCollectionService = this.entityCollectionServiceFactory.create<Contact>('Contact');
    this.contacts = this.contactCollectionService.entities$;
    this.loading = this.contactCollectionService.loading$;

    this.form = this.fb.group({
      name: ['', [Validators.required]],
      number: ['', [Validators.required]],
    });
  }
  ngOnInit(): void {
    this.getAll();
  }

  getAll() {
    this.contactCollectionService.getAll();
  }

  delete(id: number) {
    this.contactCollectionService.delete(id);
  }

  create() {
    const contact: Contact = this.form.value;
    this.contactCollectionService.add(contact);
  }
}
Listo, prácticamente tenemos nuestra libreta de contactos, antes de terminar vamos a separar nuestro contactCollectionService a una clase para poderlo inyectar donde lo necesitemos.
collectionServices/contact.collection.service.ts
import { Injectable } from '@angular/core';
import { EntityCollectionServiceBase, EntityCollectionServiceElementsFactory } from '@ngrx/data';
import { Contact } from '../entities/contact';

@Injectable({ providedIn: 'root' })
export class ContactCollectionService extends EntityCollectionServiceBase<Contact> {
  constructor(serviceElementsFactory: EntityCollectionServiceElementsFactory) {
    super('Contact', serviceElementsFactory);
  }
}
Y el app.component.ts
import { Component, OnInit } from '@angular/core';
import { FormBuilder, FormGroup, Validators } from '@angular/forms';
import { Observable } from 'rxjs';
import { Contact } from './entities/contact';
import { ContactCollectionService } from './collectionServices/contact.collection.service';

@Component({
  selector: 'app-root',
  templateUrl: './app.component.html',
  styleUrls: ['./app.component.scss'],
})
export class AppComponent implements OnInit {
  title = 'ngrx-data';
  contacts: Observable<Contact[]>;
  form: FormGroup;
  loading: Observable<Boolean>;
  constructor(
    private contactCollectionService: ContactCollectionService,
    private fb: FormBuilder,
  ) {
    this.contacts = this.contactCollectionService.entities$;
    this.loading = this.contactCollectionService.loading$;
    this.form = this.fb.group({
      name: ['', [Validators.required]],
      number: ['', [Validators.required]],
    });
  }
  ngOnInit(): void {
    this.getAll();
  }
  getAll() {
    this.contactCollectionService.getAll();
  }
  delete(id: number) {
    this.contactCollectionService.delete(id);
  }
  create() {
    const contact: Contact = this.form.value;
    this.contactCollectionService.add(contact, {
      isOptimistic: false,
    });
  }
}
Listo, tenemos nuestro primer acercamiento a ngrx data, ahora solo queda observar todo el comportamiento del estado de la aplicación en el Redux DevTools, nos queda faltando una implementación custom del DataService y jugar un poco con el apartado del caché que también es algo muy interesante que nos proporciona ngrx data.